
 Print
Print
|
|
|
|
Preparing the Database
Note: the Pressco installer will configure your database upon installation if you have purchased this option with your system. However, if you purchase this option as an upgrade, you may need to configure the database as described below.
What you need:
- A dongle with the Defect Database feature enabled (provided with the purchase of the feature).
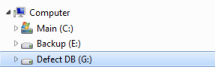
- A hard drive labeled “Defect DB” The size of the hard drive determines the number of images that can be stored. (At least 500 GB of storage is recommended, more if you are using cameras of resolutions higher than 640x480). Name the hard drive "Defect DB" using the Computer or Windows Explorer on the Intellispec system. The drive letter does not matter. Make sure to use the exact capitalization and spacing as shown.
Enabling Defect Recording versus Defect Database
Enabling Defect Recording will start saving images to the Defect Data File, which can be accessed by using the Defect Data (Images) Viewer. You can disable Defect Recording (recording of images and data of non-image type sensors) for each lane individually. However, in order to enable the Defect Database that stores defect information for each part that has been rejected, Defect Recording must be enabled. Enabling the searchable Defect Database is described next.
To enable the Defect Database:
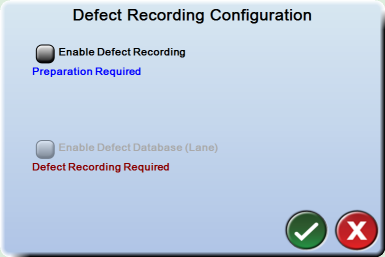
- From Lane Overview or Sensor Overview mode, select the Tools button > Lane Setup > Select Features > Defect Recording. The configuration menu is displayed. (This menu is only available when you have the configured dongle and hard drive as described above)
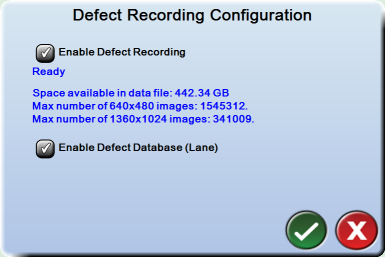
- If ”Preparation Required” is displayed, then you need to set up the Defect Database; see below. Otherwise, if any box is unchecked you can enable the option by checking it. You can only check “Enable Defect Database (Lane)” if “Enable Defect Recording” is already checked.
- If both boxes are checked, then the Defect Database is ready to use.
Prepare the hard drive for defect recording. This process needs to be done only once.
To prepare the hard drive:
 Warning
When you complete these steps, all information from the Defect DB hard drive is deleted. In addition, if you are upgrading from a system with software earlier than 5.0.480 that was already using the Defect Database, then the entire old database will be erased. This action cannot be undone.
- From the Intellispec application, go to Lane Overview or Sensor Overview mode and click the Tools button to see the tools menu.
- Select Lane Setup > Select Features > Defect Recording. The configuration menu is displayed. It should indicate that preparation is required.
- Check the Enable Defect Recording box. A message will explain that the Intellispec system will delete everything from the hard drive that it recognizes as "Defect DB."
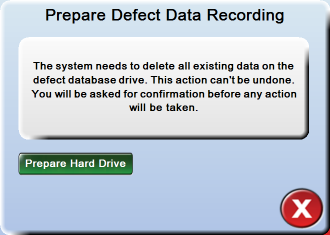
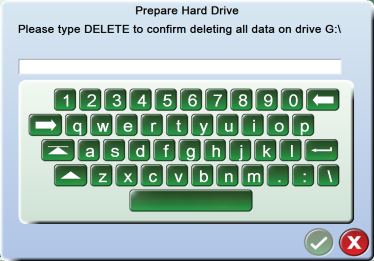
- Click the Prepare Hard Drive button. As a safety precaution, the system asks you to type the word "DELETE" before it prepares the hard drive.
- If you are sure that you want all information deleted from the "Defect DB" hard drive, type DELETE in all capital letters on the displayed keyboard, then click the OK button. This action does two things:
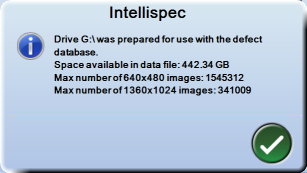
- Formats the hard drive, and
- Creates a large file on the hard drive that holds the images and the non-image sensor data. This file is shared by all lanes.
- The hard drive is prepared. A message indicating the space available on your hard drive is displayed. Click the OK button to continue.
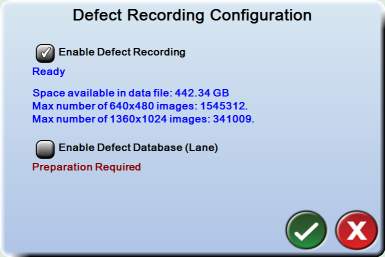
- The configuration menu is displayed, showing that Defect Recording has been enabled. The Defect Database (non-image sensor data) still needs to be prepared. Check the Enable Defect Database (Lane) box to begin preparation.
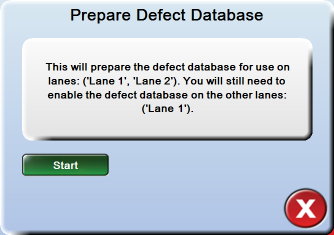
- The system displays a message stating that it will prepare the database for all lanes. Click the Start button to continue.
The Defect Database is ready to use on the lane on which it was enabled. The database will record defects and images each time you put the lane online. Enable the Defect Database for other lanes through the Defect Writing menu.
Print
|
Published: 10/13/2014 2:07:31 PM ©2015 ACME Ltd. All rights reserved. |
|